Setting up a report automation system in 4 steps with PowerBI Robots

Joel Monteiro
June 19, 2020An increasing number of organizations are adopting a report automation system to save time, money, and free their employees from the recurring task of sending colleagues and clients data from their Business Intelligence system of choice. Besides having these advantages, a report automation system is also free from human error and ensures that information always gets to the right hands in time.
Released in 2018, PowerBI Robots is a reporting automation system that uses Robot Process Automation (RPA) to recurrently and automatically deliver Power BI reports, visuals, and dashboards. Delivery is done via email, to a SharePoint library, a file system, or to any device using a browser, including smart TVs or projectors connected to the internet. In other words, PowerBI Robots lets you deliver reports to anyone, anywhere, and always on time.
If your company uses Microsoft’s Business Intelligence solution, this guide will show how easy it is to automate your reports with PowerBI Robots in 4 quick steps.
Step #1: Signing up for PowerBI Robots
To start using PowerBI Robots, you first need to create an account. Click here to go to PowerBI Robots’ landing page and click the Login button on the top right corner of the screen.
You can register for PowerBI Robots by either logging in with a Microsoft account or create an account with DevScope. If you pick the latter, click the Register Now button below Sign in with Microsoft.

You’ll need to enter a valid email address and a password. In either case, the user’s email is the only information DevScope stores. Everything else covered in this guide is stored locally at the user’s computer. Once you’re registered, it’s time to move on to step number 2.
Step #2: Setting up the desktop agent
Once you sign up for PowerBI Robots, you’ll gain access to the back office. However, before exploring it, you must first install and set up the PowerBI Robots agent on your computer. The desktop agent sets several things up but, most importantly, synchronizes your reports playlists and turns the service on or off. Without it, PowerBI Robots simply won’t work. To get started, click the large Download PowerBI Robots Agent button at the center of the screen.

Once your download is complete, extract the file, click it, and install the PowerBI Robots’ desktop agent. When the installation process is over, open PowerBI Robots Config and set up the following:
On the “General” tab:
- Add your PowerBI Robots account ID (you can find it at the top right corner of the web agent) and click Synchronize. Every time you add, edit or remove a playlist from PowerBI Robots, you must open the agent and click the Synchronize button for the changes to take place.
- Log in to your Power BI Account.
- Check the Service Configuration
You can also test your playlists here. Click Test PBIRobots Playlist Execution, and the following window will pop up:

Select the playlist you wish to test and its rendering defaults. If Override Target Delivery of Playlist is checked, your images or PDFs are stored at the location of your choice.
On the “Providers” tab:
If you’re using an SMTP service to send your reports by email or are sending them to a SharePoint library, this is where you configure it. If you don’t have the necessary information, please ask your IT manager.

Likewise, if you wish to use your Gmail account, make sure you have the following SMTP configuration:
- Host: smtp.gmail.com
- Port: 587
- Security box must be checked
To use your Office 365 account, make sure you have the following SMTP configuration:
- Host: smtp.office365.com
- Port: 587
- Security box must be checked
If “The SMTP server requires a secure connection, or the client was not authenticated” is displayed, that means your Gmail account is blocking the access. Check your inbox for an email from Gmail Security Center and follow the instructions to allow access.
On the “Service” tab:
You can choose between using a built-in Local System user or a Specific user. For the latter, make sure that specified user has read and write permissions to the installation folder (by default, C:Program Files/DevScope/PBIRobots). Don’t start the service for now.

Save all changes and close PowerBI Robots Config.
Your PowerBI Robots agent’s configuration is complete! Now, let’s move on to the fun part: creating a report playlist.
Step #3: Creating a report playlist
PowerBI Robots shares reports by grouping them in what we call a playlist. Playlists can have as many reports as you wish and be sent to as many users as you want. You can even send Power BI reports to users outside your organization using the delivery method of your choice.
To create a report playlist, return to the PowerBI Robots back office in your browser and in the Playlists tab click the Create button next to the Search bar.
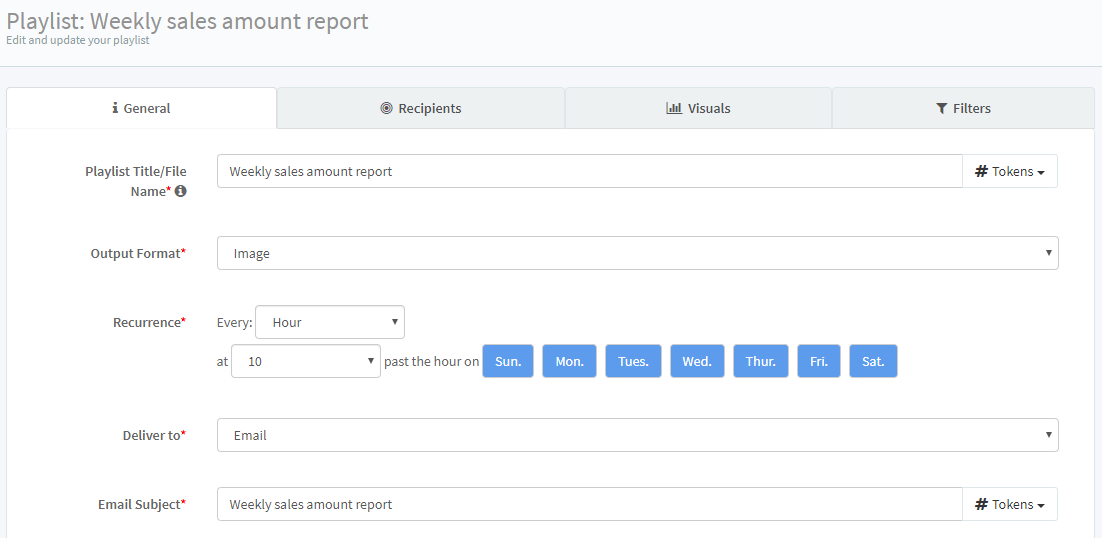
On the General tab, name the playlist, and choose the Output Format (currently, image, single or multiple PDFs, single or multiple Excel files). Then, set the screen-capture Recurrence (i.e. your data’s refresh rate) and how you want your data delivered (Deliver to).

PowerBI Robots currently supports the following delivery methods:
- Email: deliver your Power BI reports and dashboards as high-definition images, PDFs or Excel files by email. Send to as many recipients as you wish by adding them in the “Recipients” tab. Fill the subject and email message in the “General” tab.
- File System: send your Power BI reports and dashboards as high-definition images, PDFs or Excel files to a file system. You must enter the path to it in the “Recipients” tab.
- SharePoint: send your Power BI reports and dashboards as high-definition images, PDFs or Excel files to a SharePoint library. Enter the SharePoint library URL and Listname on the “Recipients” tab.
- Slideshow: display your Power BI reports and dashboards as high-definition images on any web browser. If you choose Slideshow as your delivery method, you don’t need to fill in any recipients. PowerBI Robots generates a URL you can use on any web browser to watch your playlist.
If you choose email as your delivery method, you can write the subject, the message, and Cc and Bcc users.
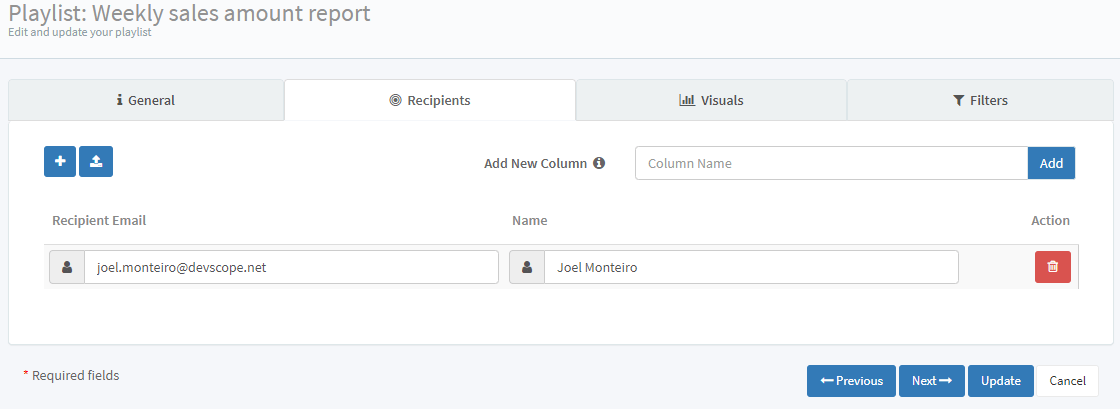
Moving on to the Recipients tab, this is where you choose the people (or SharePoint library/File system) that will receive your reports.

Since one of PowerBI Robots‘ largest advantages is the ability to share Power BI reports with people outside your organization, you may add any emails or SharePoint libraries to your recipients. Just make sure you have the proper authorization when you do it. You can add new columns next to the mandatory name and email fields. Each new category will be available as a token wherever they can be used. Tokens in PowerBI Robots are extensively covered in this article.
After selecting your recipients, move on to the next tab: Visuals.
Click Add Power BI Visual and, after signing in to your Power BI account, a screen displaying your Power BI workspace will pop-up. You may see all reports and dashboards contained on each by clicking the plus sign.

Check the boxes to select which report pages and individual tiles you wish to send and click Add. You’ll return to the Visuals tab where you can change the title, set the size, and apply report and page level filters to any reports by clicking the icon next to each PBI Url field.
Finally, in the Filters tab, you can apply user-level filters if you wish to hide from some users specific data from the report you are sending everyone. If you don’t wish to filter any data at the user-level, click the Create button to finish your playlist.
Step #4: Synching the playlist
Now that you’ve selected the reports, the users, and the frequency with which your report automation system should operate, you need to turn it on and let it do the job for you. To do this, return to the previously configured PowerBI Robots Desktop Agent, go to the Service tab, click the Start button, and press Save.

Congratulations! Your Power BI report automation system is up and running! As previously mentioned, every time you add, edit or remove a playlist from PowerBI Robots, you must open the agent and click the Synchronize button for the changes to take place, otherwise, the service will run the playlist you had previously synchronized. To stop the service, click the Stop button in the Service tab or turn off the machine running the PowerBI Robots agent.
Setting up a report automation system is just scraping the service of what PowerBI Robots can do for your organization. If you wish to learn about more advanced functions, such as sending Power BI reports to a TV, editing filters in bulk, or applying individual filters, please check the extensive PowerBI Robots 101.
You can visit PowerBI Robots’ landing page to try it for free with a few limitations that don’t affect what we covered in this blog post.
If you still have any questions regarding PowerBI Robots, please check the product’s FAQs, the helper on the web agent, or contact us by email.

Introducing PowerBI Portal – pre-register today!
We’re proud to introduce PowerBI Portal, our first product for 2020 and one that will hopefully be a game-changer for organizations with large report-sha[...]
